
You don't have to go far to hear one of the Fuse Tribe encouraging someone to capture an expert interview on a smartphone.
The thing is, I know what you're all thinking "I'm no Steven Spielberg, how the hell am I meant to film and edit an interview that's half decent?"
Don't worry; you're not alone, I thought the same until I reframed it using these three words:
Document, don't create.
I admit I've never filmed an interview on my iPhone but, I have used it to film tonnes of memories, holiday clips, and plenty of stupid things. And I suspect if you're honest, most of you have too...
So, it's fair to say we all know how to use the cameras on our smartphones... Our videos may not be Spielberg, but we certainly know how to film something.
Accepting this, I asked myself "What could I learn by attempting an expert interview?"
I figured that if I ”documented, rather than created” I'd end up:
My mind was made up, it would be win-win for everyone, and hopefully, I'd end up somewhere in the middle. One thing was sure; no matter how good or bad the interview went, something good would come out of it.
To begin with, I set myself three simple goals:
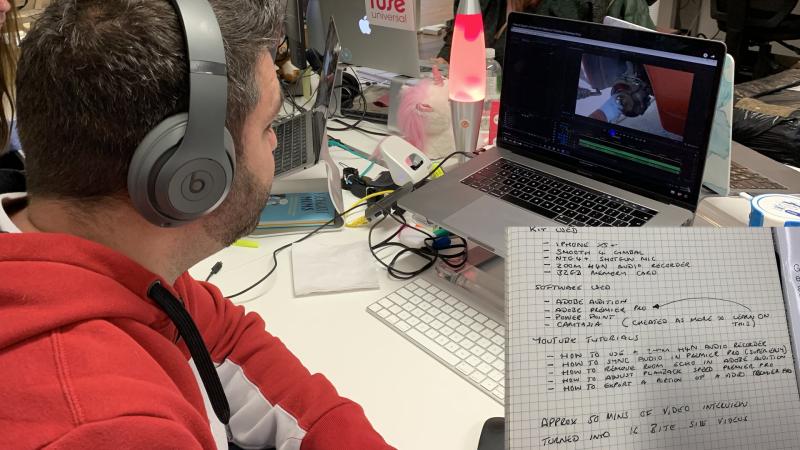
Literally everything has a battery and it's easy to forget to charge things. I put a reminder in my calendar for the night before, and I made sure that everything that was rechargeable was charging. Everything else had fresh batteries with a few spares.
I knew how to use my iPhone, and the Zhiyun Smooth 4 (for the purposes of this interview the Smooth 4 was used only as a tripod).
What I didn't understand was how to use the equipment my content team had lent me. I'd been handed something which looked like it had fallen straight from an episode of Star Trek, and something that resembled a small light-sabre. I later found out these were Zoom H4n Pro audio recorder and a Rode NTG4+ shotgun microphone.
There was only one thing for it.
Hello YouTube my old friend... and Bingo! I'd come up trumps with this tutorial: How to use the Zoom H4N portable audio recorder.
I watched the tutorial, and after a few tests, I was happy that I kind-of knew what I was doing. Ok, I was capable of pressing a button and audio would be recorded on a couple weird looking devices.
The interview I'd planned was with Simon Manchipp to get his perspective on "How can L&D create a brand".
Given L&D isn't Simon's typical audience, I wanted to keep the interview conversational. The alternative would have been very prescriptive questions. This, I feared, would lead to less value as merely answering my questions, misses out on the most significant part of an expert interview - their expertise.
In my notebook I literally scribbled the following as nothing more than prompts to guide me:
That was it. My intention was to understand the branding concepts L&D could borrow. I knew that if I went in with leading questions, Simon wouldn't have been himself leaving his expertise locked away.
The offices at SomeOne are pretty cool (a converted warehouse). To capture the interview footage, Simon took us upstairs to their meeting room in the attic, where it's a bit quieter.
With a quick shuffle around to make the background scenery a little less cluttered, we set-up the tripod, the iPhone, and positioned the microphone (#MISTAKE 1: I left the microphone in shot 🤦🏻♂️).
After a couple of sound and video tests, we entered the unknown. We began our conversation (#MISTAKE 2: Staying quiet is difficult, especially as it was a conversation 🤫).
After about 30 minutes of good conversation, there was a clatter and then a noticeable background hum as the air-con unit started. At this point, I felt like it was all over, I really thought the background noise would ruin the sound completely. (#MISTAKE 3: I forgot to check for and turn off the air-con 💨).
I had a video on my iPhone, sound on the Zoom recorder. I now needed to get these onto my Mac and begin the editing process. My goal was to take an hour-long interview and break it up into smaller bite-sized pieces based on our conversation flow.
I quickly realised there was going to be a lot of files. So, staying organised was going to be necessary, especially as I'd need to use a few applications to bring it all together.
I settled on the following directory structure:
YYMMDD - Project Title
------Footage (All the unedited footage saved here)
------Audio (All the captured audio files saved here)
------Design Assets (All the branding assets other visuals saved here)
------Documents (Any scripts, interview questions saved here)
------Exports (The edited and finalised video output saved here)
Next, I wanted to see how the audio had come out, and I feared the worst.
The advice my content team had shared with me made a world of difference. Using an external shotgun microphone to capture directional sound seriously levelled up the audio quality.
Because the audio recording was focused on Simon, the air-con noise was hidden and fell into insignificance - check it out below.
Now, you may be asking "how did I sync the audio from an external microphone with the footage?". This was a question I had to answer for myself, and I found the answer in another YouTube video.
Thankfully, as I'm in the marketing team, I've got access to the Adobe Creative Cloud suite of apps. With a quick search, I came up trumps with this tutorial: How To Sync Video And Audio In Premiere Pro [SUPER EASY]
Can you [GUESS] why I clicked on that tutorial? 😂
NOTE: I had planned on removing the room echo and air-con unit noise from the original footage captured on my iPhone. As the shotgun microphone was so clear, I decided there was little point. That being said there's an excellent tool built into Adobe Audition: How to Remove Room Echo in Adobe Audition.
Perhaps the silliest of mistakes to have made, but the easiest to fix. Leaving the microphone in shot was a complete schoolboy error.
Before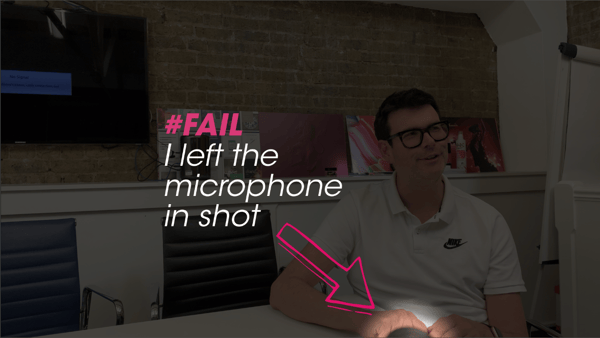
After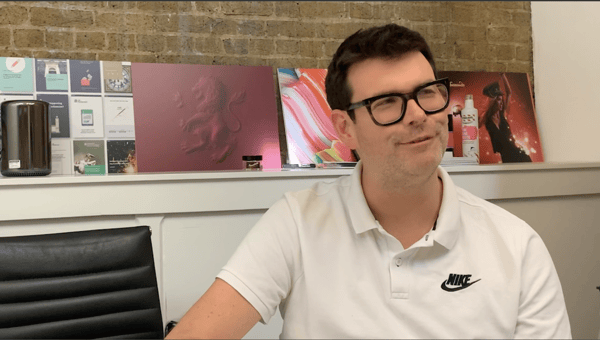
In Camtasia, it's really easy to scale your video. So, with some resizing, I was able to compose the video losing the microphone, and framing Simon nicely.
Ok, so this is where my seemingly small mistake came back to bite me.
Since filming the interview, I've learned of the phrase "film for the edit".
This means, accept that you're going to have to edit your videos so make life easy for yourself. Trust me, it's worth it!
When you're capturing your interview or video, make time to pause. If you pause, you have natural gaps which you can use in the editing stage, so you don't end up with choppy cuts, as I did 😰.
You'll notice that because I spoke in several places I had to cut the footage off quickly, and it feels a lot less natural on the viewer.
Finally, perhaps the most significant lesson. Don't underestimate how much time editing takes.
I have a newfound empathy for video editors. It requires patience and a lot of precision. Even the simplest of things on screen can be complex to achieve off screen and need to be painstakingly worked through.
Getting a good result is very achievable, no matter what your skill level. Just be prepared to allow yourself time and patience.
I wanted to use Adobe Premiere Pro more aggressively, but there is so much to learn and time didn't allow. To ship my interview in the time I’d allowed, I only used Adobe Premiere Pro for the advanced audio synching. Then switched back Camtasia for the rest as it's drag and drop and I'm familiar with it.
I'll continue my Adobe Premiere Pro exploration in the coming months.
There you have it, proof anyone can record an expert interview, even a rookie like me. It was a lot of fun, and I recommend you all have a go.
Practice on a friendly, someone in your team, or a relative.
Go on, give it a go.
The Tribe Academy is a free global community being built by Fuse. We're actively creating content, and would love your input on what you'd find most valuable.
If you'd like to sign up for the Tribe Academy please join us, and if you have any content suggestions, please comment below.
![]()
![]()
No Comments Yet
Let us know what you think